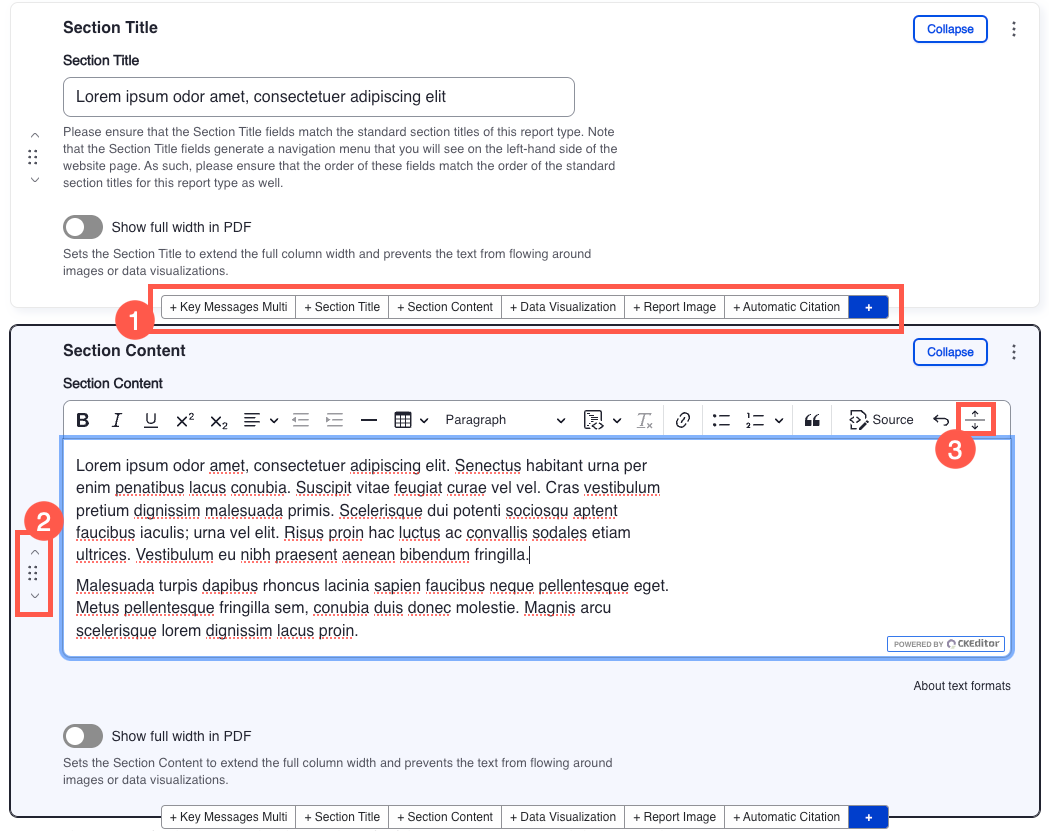
Once you have filled out the relevant information in the Metadata and Search Engine Optimization tabs, click the Content tab to add all section titles, section content, images, data visualizations, automatic citation, and endnotes.
The directions to build your report will vary if you need to add a translation or upload a PDF:
The table below shows which report types are built in the CMS and use autogenerated PDFs, as well as those that currently require a PDF upload.
|
Report Type |
Build-in website or PDF upload? |
|---|---|
|
PDF upload required. Skip to Add Key Messages or Add Section Title to add website content. |
|
PDF upload only. Do not add additional website content; skip to upload-PDF. |
|
Build in website; use data visualizations and auto-generated PDF.* *Only Pashto or Dari translations of Afghanistan reports should be PDF uploads as described here. |
Content blocks
Within the Content section, each piece of content will be entered into a content block. Options are:
|
Title |
Description |
|---|---|
|
Add Key Messages Multi |
Add all key messages to this content block so that they are pulled into country and regional pages. |
|
Add Section Title |
Add all first level headings as a Section Title so that they show up in the side bar navigation. |
|
Add Section Content |
All general section content, including body text, most headings, and tables, is added using a Section Content block. |
|
Add Data Visualization |
Add a data visualization to the report. |
|
Add Report Image |
Add an image to the report. |
|
Add Automatic Citation |
Add an auto-generated recommended citation to the report. |
|
Add Key Messages
|
Not currently used. Add each key message individually to this content block so that the KMs are pulled into country and regional pages. |
|
PDF Page Break |
Inserts a page break into the autogenerated PDF. |
Basic report building instructions
Use the links in this list or in the left hand menu for more details on each step.
-
Add an AFI map visualization if needed.
-
Add Key Messages.
-
Add a Section Title.
-
Add Section Content.
-
Copy and paste text into the Section Content block until one of the following occurs:
-
You reach a section title. Create a new Section Title block.
-
You need to add a figure. Add a Report Image or Data Visualization block.
-
You reach the end of the report.
-
-
-
Continue to add Section Content, Section Title, and Report Image or Data Visualization blocks.
Break up text into multiple Section Content blocks to place images as close to their reference as possible. For most images, the best placement will be either right before or right after the paragraph where the figure is referenced. An image might need to placed a few paragraphs from its reference in order to balance web and PDF formatting.
-
Add an HFA map visualization if needed.
-
Add an Automatic Citation block. The system will automatically add the recommended citation to your report according to the report language.
-
Preview your report, including the PDF, and tweak formatting as needed.
-
Review and publish your report.
Adding and reordering report content blocks
The CMS includes the following options to add and reorder content blocks:
1. Add a new content block before or after existing blocks in the CMS.
2. Reorder existing content blocks. The 6-dot icon to the left of each content block can be used drag it to a new location. The up and down arrows surrounding the icon can be moved to move the content block up or down one spot.
3. Split section content. The Split Paragraph button can be used to split text in a Section Content block into two separate blocks. Place your cursor where you would like to split the text before selecting the button.

Copying and pasting text from Microsoft Word
-
Open your report in the Microsoft Word Desktop Application. Avoid editing or copying text in your report from the SharePoint link through your browser.
-
To paste text copied from Microsoft Word to the relevant fields in the CMS, select Ctrl+V or use the right-click paste function.
-
Formatting should copy over correctly. However, you should do a quick check for:
-
Text alignment: All text should be left aligned and not justified. You can change the alignment by selecting text and then clicking the Align Left button.
-
Text that is incorrectly hyperlinked: To fix, copy the affected text again in Word, and paste into the CMS content field using CTRL+SHIFT+V on Windows (Cmd+Shift+V on Mac). As this method removes all links, it should only be used when text appears incorrectly hyperlinked in the CMS.
-
-
To undo any actions, select Ctrl+Z or use the undo button on the right side of the editor ribbon.
Saving your report
Regularly saving your work while building your report is highly recommended. As a backup, the CMS will automatically save a report that is open for editing every 30 seconds.
To save your report and continue editing, click Save and Edit.
To save and preview your report, click Save and Preview. To return to the report builder from a preview, click Edit.
When a user has a report open for editing, it is locked to prevent other users to make changes. If a second user tries to open the report for editing, they will receive a message showing the email of the user currently editing the report and how long it has been open. The Break Lock option can be selected to take over editing if the first user is unavailable or requires assistance. Since this option could result in the loss of unsaved changes, it should be used with caution.
Previous: Create a New Report
Next: Add an AFI Map
