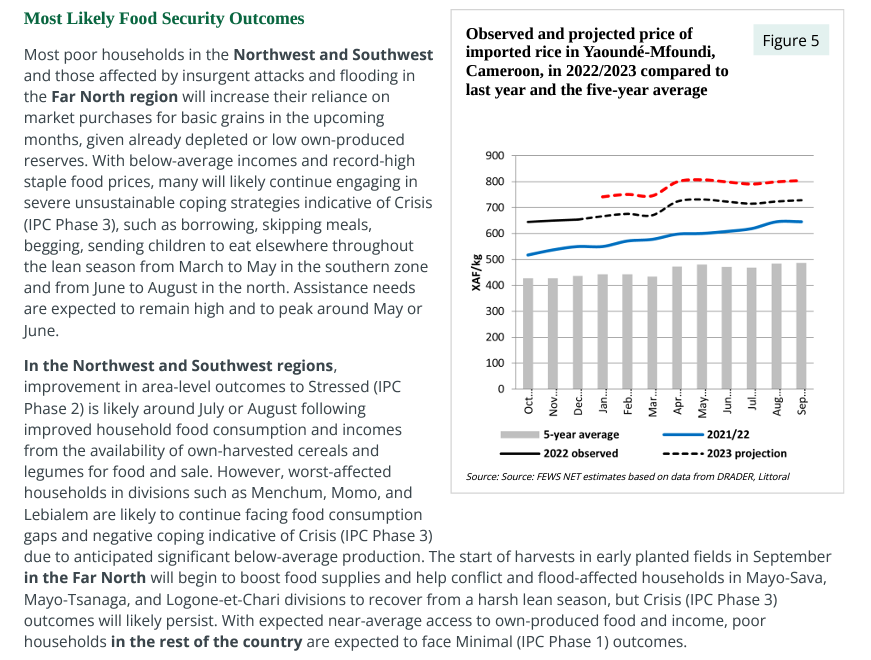
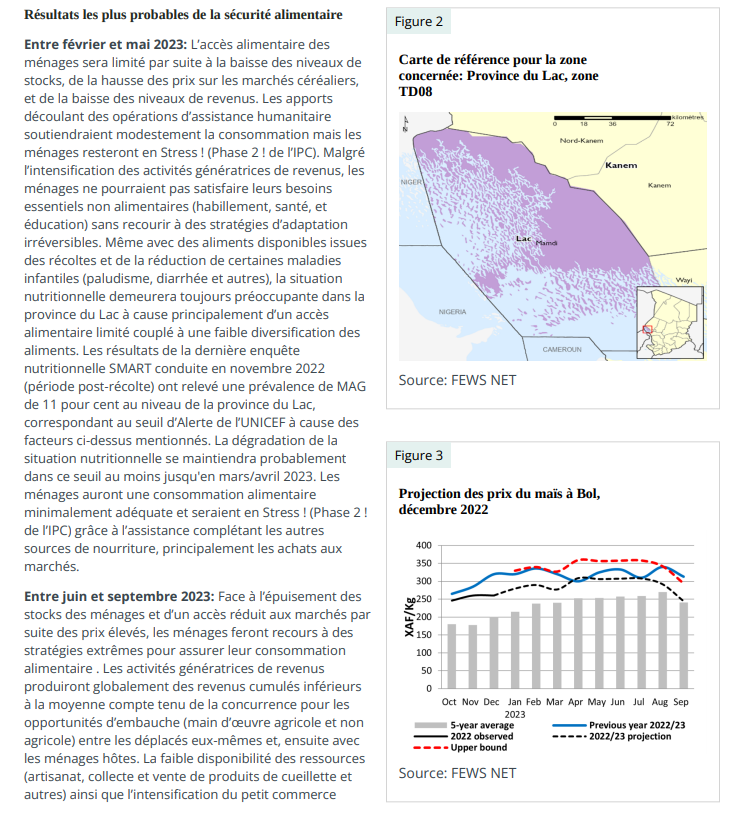
Images uploaded to the CMS must be high-resolution and should be saved with the recommended naming convention. Find step-by-step guidance on saving images on the Publish Reports in the CMS page, with additional troubleshooting information available below.
Adding an image
-
From the Content tab in the CMS Create Report editor, select the Add Report Image content block.
-
Title Text: Paste the figure title into the text field.
-
Caption: This optional field can be used to provide additional detail or description not captured by the title. This is a useful field to use when a title is particularly long and some information can be pulled out from a title into a caption.
-
Image: Select Add media.
-
You can add one or more images to the Media Library by dragging and dropping files to the gray Image upload box or choose Select files > select the file(s) from your folder library > Open. Complete the following on the upload screen:
-
Alternative text: Provide alternative text summarizing the image using the Writing Alt Text guidance.
-
Language: The language should match the language of the report. Select from the drop-down menu.
-
Click Save. The images will appear in the Media Library as selected (with a blue outline and checkmark). Deselect any additional images you have uploaded at this time to leave a single file selected.
-
-
You can alternatively select a previously uploaded image from the Media Library. Older uploads can be searched for using the Name field. Review naming guidance.
-
Click Insert selected.
-
-
Source:
-
Source Title: Paste the source title for the image into the text field. If no source should be listed for the image, leave the field blank.
-
URL: Paste a source link if applicable. Keep the auto-populated text “<nolink>” if you are including a Source Title that does not need a URL link.
-
-
Show Figure Label: Click button to toggle on (button should appear green) for any image that should have a figure label. Do not turn the toggle on for AFI maps, HFA maps, or Seasonal Calendars.
-
Show full width in PDF: Turn toggle on for figures that you would like to display full-width in the web-generated PDF. Always set Seasonal Calendars to full-width.
-
Float Position: The float position determines where the image will be located in the report PDF. By default, images float right; that is, they are placed in the right hand side of the PDF. To position images side-by-side in the PDF, set the first image to Float: Left and the second image to Float: Right.
Bulk upload images
You have the option to upload multiple image files directly to the Media Library before adding them to a report.
-
From the admin toolbar at the top of the website, go to Content > Add media > Media library.
-
Select + Add media to upload a single file or + Upload media in bulk to add multiple files.
-
Select Image.
-
Drag and drop your file(s) onto the gray Image upload box or click Select files to choose the file(s) from your computer.
-
Complete the following on the upload screen:
-
Alternative text: Provide alternative text summarizing the image using the Writing Alt Text guidance.
-
Language: The language should match the language of the report. Select from the drop-down menu.
-
Click Save.
-
-
Your images should now appear in the Media Library. When filling out a Report Image block in your report you will click the Add media button, select a file you uploaded to the Media Library, then click Insert selected.
Layout options
You can break up text into multiple Section Content blocks to place images either right before or right after the paragraph where the figure is referenced. Further guidance on arranging text and images can be found below and on the PDF Formatting page.
It is helpful to preview the PDF after adding a few images and/or Visualizations so you can adjust the layout as needed while building your report.
To preview your PDF, click Save and Preview to view the report webpage, then click the Download the Report button. Use the examples below to adjust the settings for text and images as needed.
The text that comes after a figure on the report webpage will be the text that wraps around the figure in the PDF.
A single image with text wrapped
Within the CMS, place items in the order below, and use the default settings:
-
Image
-
A Section Title or Section Content block that includes the text that will wrap around the figure.
Two images stacked vertically with a large block of wrapped text
Within the CMS, place items in the order below, and use the default settings:
-
First image
-
Second image
-
A Section Title or Section Content block that includes the text that will wrap around the images.
If the first image fits on a page, but the second image doesn’t, this may create a gap of white space.
If this happens, review the Common Issues and Solutions.
Two images side by side
Place items in the order below, using the indicated settings:
-
First image: Float left
-
Second image: Float right
If, as in the example here, your images are not the same size and you want the text not to wrap, you will need to turn on the Show full width in PDF toggle for the text block.
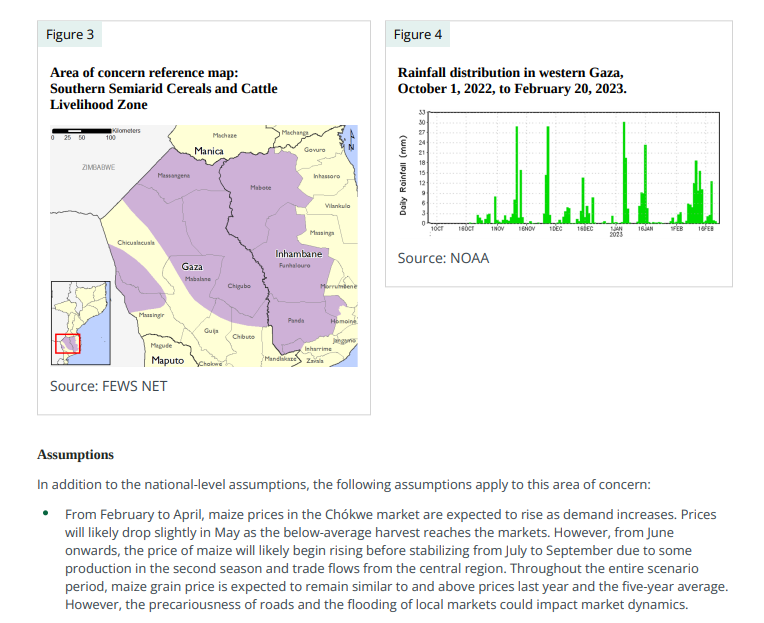
Image troubleshooting
If your image isn’t showing up well on the report webpage or in the PDF, try the solutions listed below to make it clear and accessible.
Blurry image
If your image is blurry, try the following:
-
Check how you saved the image. Is it coming directly from the original source, or has it been saved multiple times? Try to obtain the original image if possible and refer back to the guidance on preparing images.
-
If your image is a screenshot, zoom in before recapturing the image.
Image is too small in the PDF
If your image is too small to be readable in the PDF:
-
Use the Show full width in PDF toggle to set the image to take up the full width of the PDF page. Seasonal calendars should always be set to full width.
-
Consider whether the image itself can be adjusted to improve the sizing.
Previous: Add Section Content
Next: Writing Alt Text