Geographic Unit relationships provide a path for the system to follow when comparing data across different administrative versions, e.g., ML_1983 to ML_2016.
Changes such as a Geographic Unit becoming smaller by splitting in two or three parts, or getting bigger by merging with others, can severely compromise the ability to compare data such as crop statistics over time. For example, you may want to analyze the productivity of that Geographic Unit’s farming activities per unit of area over time.
Geographic Unit relationships provide a record of these changes, and is a fundamental tool in doing spatial analyses that compare statistics with remotely-sensed (e.g. satellite-based) analyses of weather, and rainfall, and a variety of other key indicators.
Geographic Unit relationships can be updated in three ways.
-
If you need to update a few relationships, this can be done individually within the FDW.
-
If you need to update many relationships, this is best done by uploading a relationship table.
-
When adding new Markets and IDP camps, their relationships to admin units can be specified by adding a
parentcolumn that contains the FNIDs to the file. FDW will automatically create the relationships upon upload.
If a Geographic Unit has changed in name only, it does not need a new FNID or re-defined relationships.
Relationship types
Temporal relationship types:
-
Boundaries stay the same and data can be aggregated both forward and backward in time.
-
Successor: This administrative unit did not change between Geographic Unit Set Versions.
-
Equivalent: Two units are equivalent between different Geographic Unit Sets and do not need to be the same unit type, e.g., population and crop production units that are equivalent.
-
Seceded: Two units are equivalent between different Geographic Unit Sets, are the same unit type, and can be part of separate countries, e.g., the admin 1 states of South Sudan seceded the admin 1 states of Sudan.
-
Name change: Only the name has changed between Geographic Unit Set Versions.
-
Promotion: An administrative unit becomes a higher-level administrative unit, e.g., Admin2 becomes Admin1.
-
Demotion: An administrative unit becomes a lower-level administrative unit, e.g., Admin1 becomes Admin2.
-
-
Boundaries change.
-
Data can be aggregated forward in time.
-
Merge: Parts of, or the whole of, two or more administrative units were joined together to create a new administrative unit version in the same Geographic unit set.
-
Aggregate: Parts of, or the whole of, two or more administrative units were joined together to create a new administrative unit. However, unlike merge, this relationship doesn’t indicate anything about the relationship between the Geographic unit sets.
-
-
Data can be aggregated backward in time.
-
Split: One administrative unit was divided to form two or more new administrative units.
-
Split_demotion: One administrative unit was divided to form two or more new administrative units and the new units are demoted to a lower admin level.
-
-
Data can not be aggregated.
-
Redistribute: Parts of more than one administrative unit were divided and redistributed into more than one new administrative unit.
-
-
Hierarchical relationship types:
-
Definition of one unit within another.
-
Admin unit relationships e.g.,
admin1_0indicates the unit is an Admin 1 within a specific Admin 0. -
Crop production reporting unit relationships e.g.,
crop_level2_1indicates the unit is a Level 2 crop production reporting region within a specific Level 1. -
Market relationships e.g.,
market-admin2indicates the unit is a market within a specific Admin 2.
-
Extracting Geographic Unit relationships
Geographic Unit relationships defined in FDW can be extracted from the FEWS NET API using the geographicunitrelationship endpoint: https://fdw.fews.net/api/geographicunitrelationship. For example, relationships for Geographic Units in Kenya can be retrieved using the following request: https://fdw.fews.net/api/geographicunitrelationship.json?country_code=KE. Endpoint-specific filters include from_unit, to_unit, and relationship_type.
For more information about constructing API requests, see FEWS NET API.
Updating Geographic Unit relationships
To add individual unit relationships:
-
Go to Metadata Management > Spatial > Geographic Unit Relationships.
-
Click Add Geographic Unit Relationship.
-
Choose a From Unit and a To Unit. You can search for units by typing a unit's name into the drop-down menu.
-
Choose a Relationship Type.
-
Click one of the Save options.
Preparing and uploading relationship tables
A relationship table defines the evolution of Geographic Units year by year, and the type of changes that occur to them, for every Geographic Unit a country has had over a defined period of time.
Preparing tables
To prepare a relationship table for upload, you will need to copy the relationship data from one tab to another in the relevant spreadsheet.
The relationship table tab must be the first tab in the spreadsheet. Relationship tables should be completed before they are uploaded.
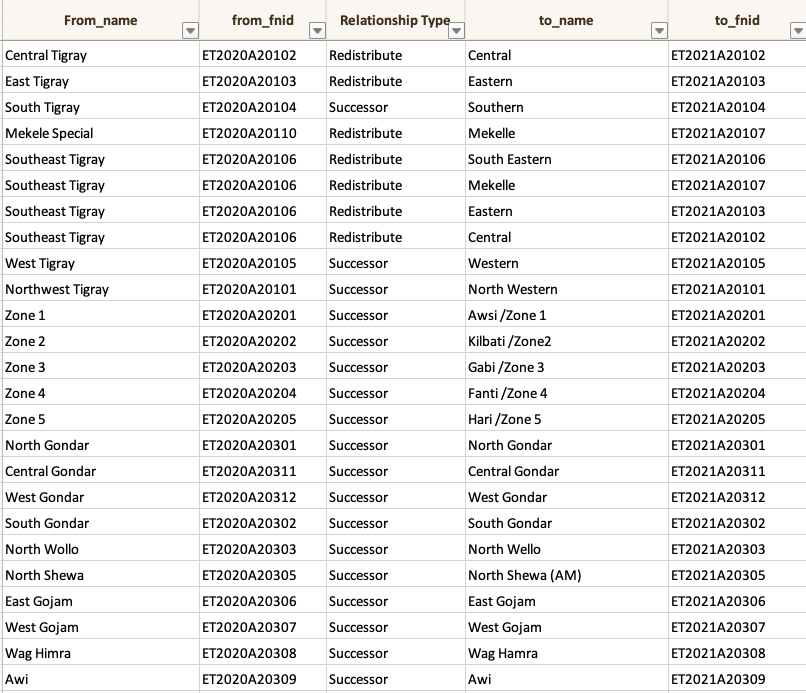
The relationship tab should be set up as follows:
|
from_unit_name |
from_unit |
relationship_type |
to_unit_name |
to_unit |
|---|---|---|---|---|
|
|
The FDW will also accept "from_fnid", "from fnid", "fromfnid", or "fnid_from_unit" as the column header. |
The FDW will also accept “relationship type” or “relationship” as the column header. |
|
The FDW will also accept "to_fnid", "to fnid", "tofnid", or "fnid_to_unit" as the column header. |
|
This column should contain the name of the old Geographic Unit. |
This column should contain the FNID of the old Geographic Unit. |
This column should include the type of relationship between the old and new units. Use a type from the list at the beginning of this page. |
This column should contain the name of the new Geographic Unit. |
This column should contain the FNID of the new Geographic Unit. |
To copy the information:
-
You will need to copy the appropriate information from the FlowChart tab to the Relationship Table tab.
-
Copy information by dataset.
-
If there are multiple relationship sets, copy the data for the oldest start year first so they are at the top of the sheet. When all relationships for that year are done, begin again for the next set. This ensures the data are ordered chronologically.
-
For cases where one start row splits into multiple rows in the FlowChart tab (e.g., when a unit splits or redistributes), copy over the starting information for each individual split.


Uploading relationship tables
-
Go to Metadata Management > Spatial > Geographic Unit Relationships.
-
Click Import Geographic Unit Relationships.
-
Click Choose File.
-
Choose a format from the dropdown menu. This will likely be xls(x).
-
Click Submit.
-
Confirm the import.
Troubleshooting relationship table uploads
Possible errors when uploading relationship tables include:
-
Extra columns: If the file contains extra columns that are not recognized by FDW, the upload will fail with an error message that notes the unidentified metadata. Remove the extra columns before re-uploading the file.
-
New Geographic Units: If the file contains units do not already exist in FDW, the upload will fail noting the unidentified units. Upload the new units to FDW before re-uploading the file.